
# Open WebUI MCP Integration: MCPO and Claw Cloud Deployment
In the field of AI application development, seamless integration between models and tools has always been crucial for enhancing productivity. Open WebUI, as a feature-rich open-source interface framework, provides an intuitive interaction method for large models. However, to fully leverage the tool-calling capabilities of large models, we need to integrate them with the mainstream MCP (Model Context Protocol). This article will provide a detailed guide on implementing this integration through MCPO and utilizing Claw Cloud Run’s free container resources for zero-cost MCPO deployment.
# Architecture Overview
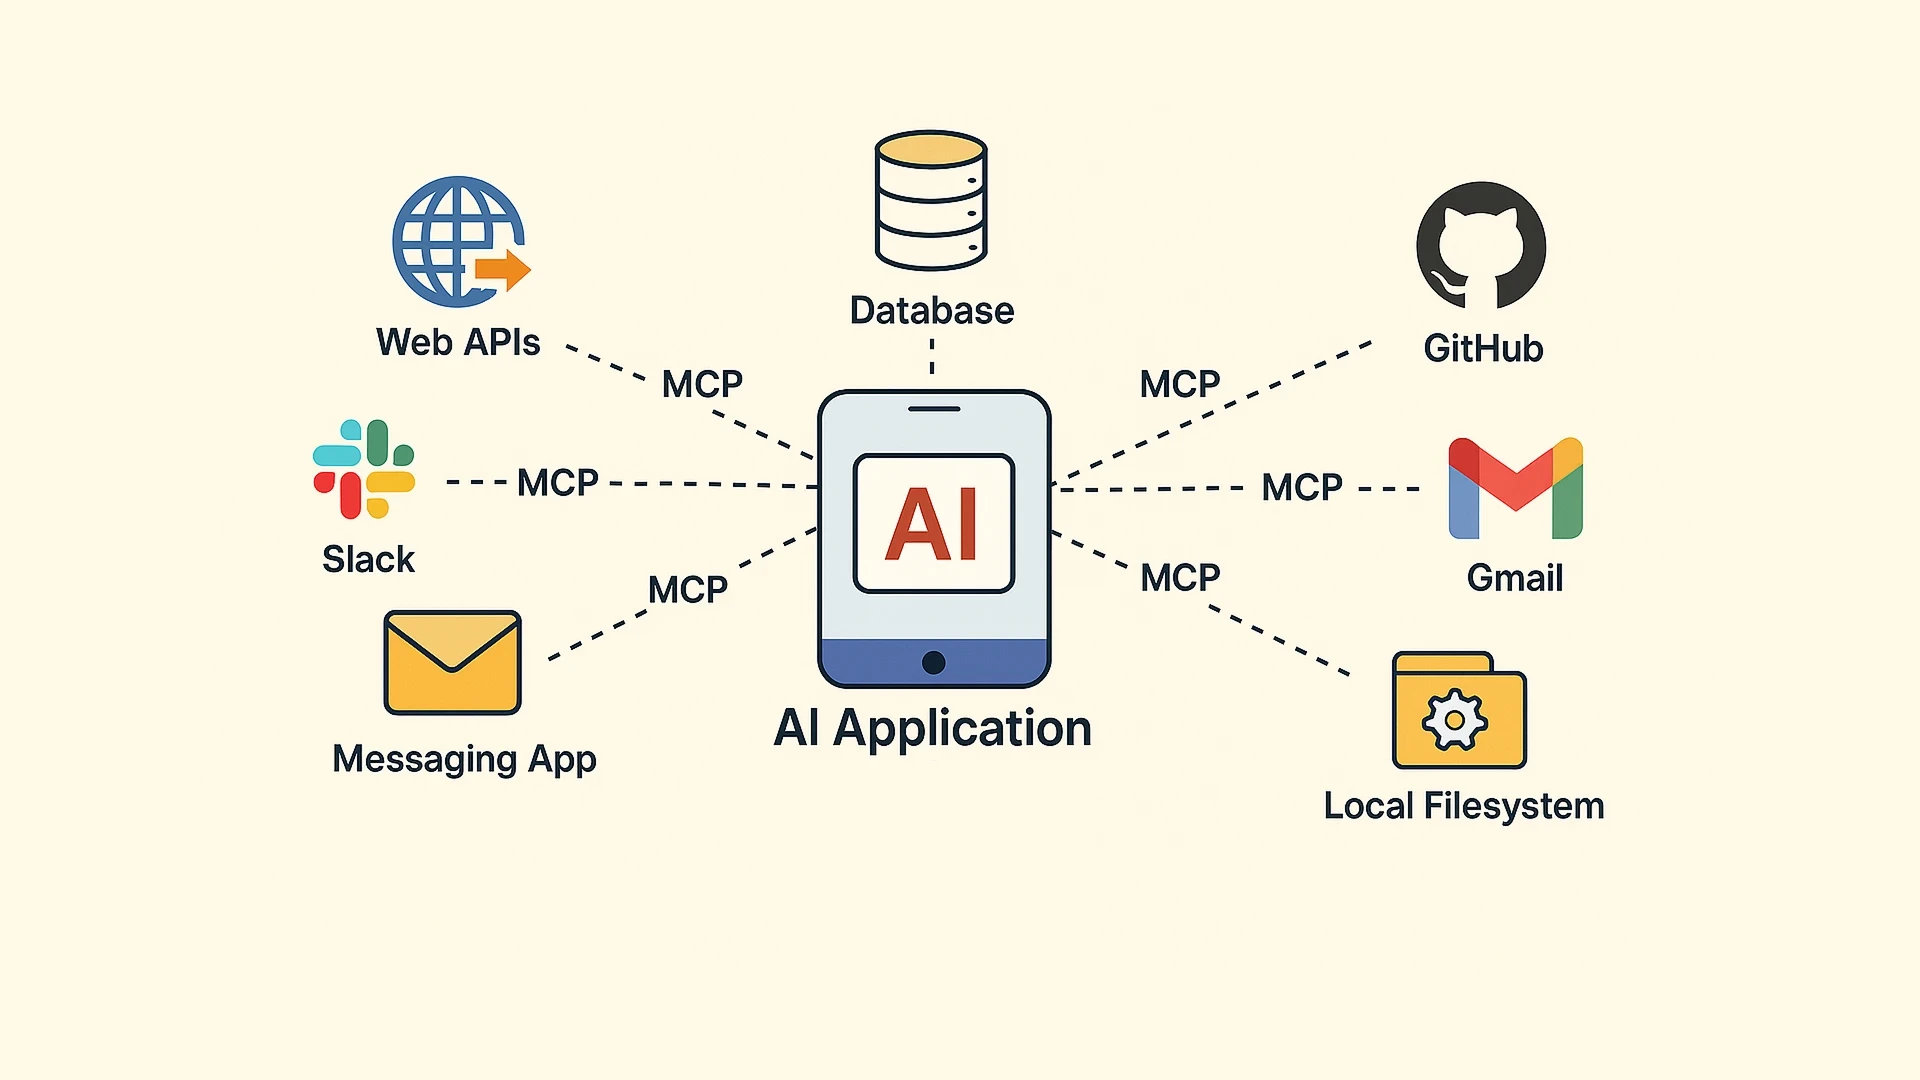
Before diving into implementation, let’s understand the integration architecture between Open WebUI and MCP. Here’s a simplified architecture diagram showing the relationship between Open WebUI, MCPO, and MCP servers:
| |
# MCP Protocol Overview
Model Context Protocol (MCP) is an open standard introduced by Anthropic in November 2024, aimed at establishing secure, bidirectional connections between AI applications and external data sources and tool systems. MCP solves the data silos problem that AI models have long faced, where even the most advanced models are often trapped in information silos and cannot effectively access external systems and real-time data.
# Core Architecture
MCP adopts a client-server architecture built on JSON-RPC 2.0 protocol, providing a stateful session protocol. The entire ecosystem includes three core components:
- MCP Clients: AI applications or agents that wish to access external systems, such as Claude Desktop, IDE plugins, etc.
- MCP Servers: Bridges between the MCP world and specific external systems, encapsulating external functionality according to MCP specifications
- MCP Hosts: Act as “containers” or coordinators for multiple client instances, managing lifecycle and security policies
# Three Core Primitives
MCP provides context to language models through three basic building blocks:
- Tools: Functions that LLMs can call to perform specific operations, such as weather query APIs
- Resources: Data sources that LLMs can access, similar to GET endpoints in REST APIs, providing data without performing significant computation
- Prompts: Predefined templates for optimal use of tools or resources
# Communication Methods
MCP supports two main communication methods:
- stdio (Standard Input/Output): Used when client and server run on the same machine, suitable for local integration
- HTTP via SSE (Server-Sent Events): Client connects to server via HTTP, suitable for remote service integration
# Ecosystem Development
Since its release, MCP has gained widespread industry adoption:
- Official Support: Major AI providers like OpenAI and Google DeepMind have adopted the protocol
- Enterprise Integration: Companies like Block, Apollo, Zed, Replit, Codeium, and Sourcegraph have implemented MCP support
- Open Source Ecosystem: Over 1,000 open-source connectors have emerged by February 2025
- Service Integration: Supports popular enterprise systems like Google Drive, Slack, GitHub, and PostgreSQL
# Security Considerations
MCP has thoroughly considered security in its design:
- OAuth 2.1 Authentication: The protocol mandates OAuth 2.1 framework for authenticating remote HTTP servers
- Resource Indicators: MCP clients must implement resource indicators (RFC 8707) to explicitly specify the intended recipient of access tokens
- Permission Control: Supports role-based permission management and user authorization
The emergence of MCP transforms the original “N×M problem” (each data source requires a custom connector) into an “M+N problem”, where tool creators build N MCP servers and application developers build M MCP clients, greatly simplifying the complexity of AI tool integration.
# Part One: MCPO Introduction and Local Testing
# 1.1 What is MCPO?
MCPO is a lightweight proxy server that receives MCP server commands and makes them accessible through standard RESTful OpenAPI, so tools can work “out of the box” with LLM agents and applications that expect OpenAPI servers. Simply put, it acts as a translation layer between Open WebUI and MCP tool servers. By converting MCP protocol to standard OpenAPI specifications, MCPO enables MCP services to be accessed by Open WebUI in RESTful API form.
MCPO’s core advantages include:
- Protocol conversion: Converts MCP communication to OpenAPI-compatible HTTP interfaces
- Security isolation: Establishes security boundaries between browser clients and local services
- Multi-tool support: Can simultaneously proxy multiple MCP servers for tool expansion
- Automatic documentation: Automatically generates interactive OpenAPI documentation for each MCP tool
Quick Usage:
The officially recommended approach is to install and configure MCPO through the uv package manager, which can start MCPO service in one line:
| |
You can also use Python + pip installation:
| |
# 1.2 Local Testing of MCPO
In this article, we use Docker containers to run MCPO service and configure MCP Servers based on config.json file.
# Step 1: Prepare Configuration File
First, create a config.json file with the following content (we’ll use only memory and time tools for testing):
| |
Each specific MCP Server has several optional fields, the most common being command, args, type, url, and env:
command: Specifies the MCP Server startup commandargs: Parameter list passed to MCP Servertype: Specifies MCP Server type (such as sse, streamable_http, etc., default is stdio, no need to fill)url: If MCP Server provides service through sse or streamable http protocol, need to specify its URLenv: Specifies MCP Server environment variables, generally user authentication information
# Step 2: Create Docker Compose File
Next, write the corresponding docker-compose.yml file:
| |
# Step 3: Start MCPO Service
Run the following command in the current directory to start MCPO service:
| |
# Step 4: Verify Service Running
Run CURL command to test if MCPO service is running normally:
| |
Normally, it should return the following content:
| |
At this point, local testing of MCPO service is complete. Next, this article will introduce how to deploy it to Claw Cloud Run and integrate it with Open WebUI.
# Part Two: Free MCPO Deployment on Claw Cloud Run
# 2.1 Claw Cloud Run Platform Introduction
Claw Cloud Run is a professional containerized application deployment platform that focuses on providing developers with simple and efficient cloud-native application deployment experiences. Compared to traditional cloud services, Claw Cloud Run has the following characteristics:
# Platform Features
- Simple Deployment: Supports direct deployment from Docker images without complex configuration
- Elastic Scaling: Supports elastic scaling with appropriate resource configuration
- Global Acceleration: Has multiple regional nodes providing faster access speeds
- Developer Friendly: Provides intuitive web console and complete API interfaces
# Free Tier Policy
Claw Cloud Run provides generous free tier for GitHub users registered for more than 180 days:
- Computing Resources: $5 monthly free tier
- Network Traffic: Includes certain amount of outbound traffic
- Storage Space: Provides basic persistent storage
- Domain Service: Free
.clawcloudrun.comsubdomain
Tip
The free tier is sufficient for development and testing needs of small to medium projects. For production environments, consider upgrading to paid plans based on actual usage.
# Technical Architecture
Claw Cloud Run is built on Kubernetes and provides:
- Multi-region Deployment: Supports multiple regions including Asia-Pacific, Europe, and North America
- Load Balancing: Built-in intelligent load balancing and failover
- Monitoring & Alerting: Real-time monitoring of application status and performance metrics
- Log Management: Centralized log collection and analysis
# 2.2 Prerequisites
Before starting deployment, ensure the following accounts are prepared:
- GitHub Account: Must be registered for more than 180 days (for free tier verification)
- Claw Cloud Account: Login via GitHub account authorization
- Domain (optional): If custom domain is needed, prepare domain and DNS management permissions
# 2.3 Create Application Deployment
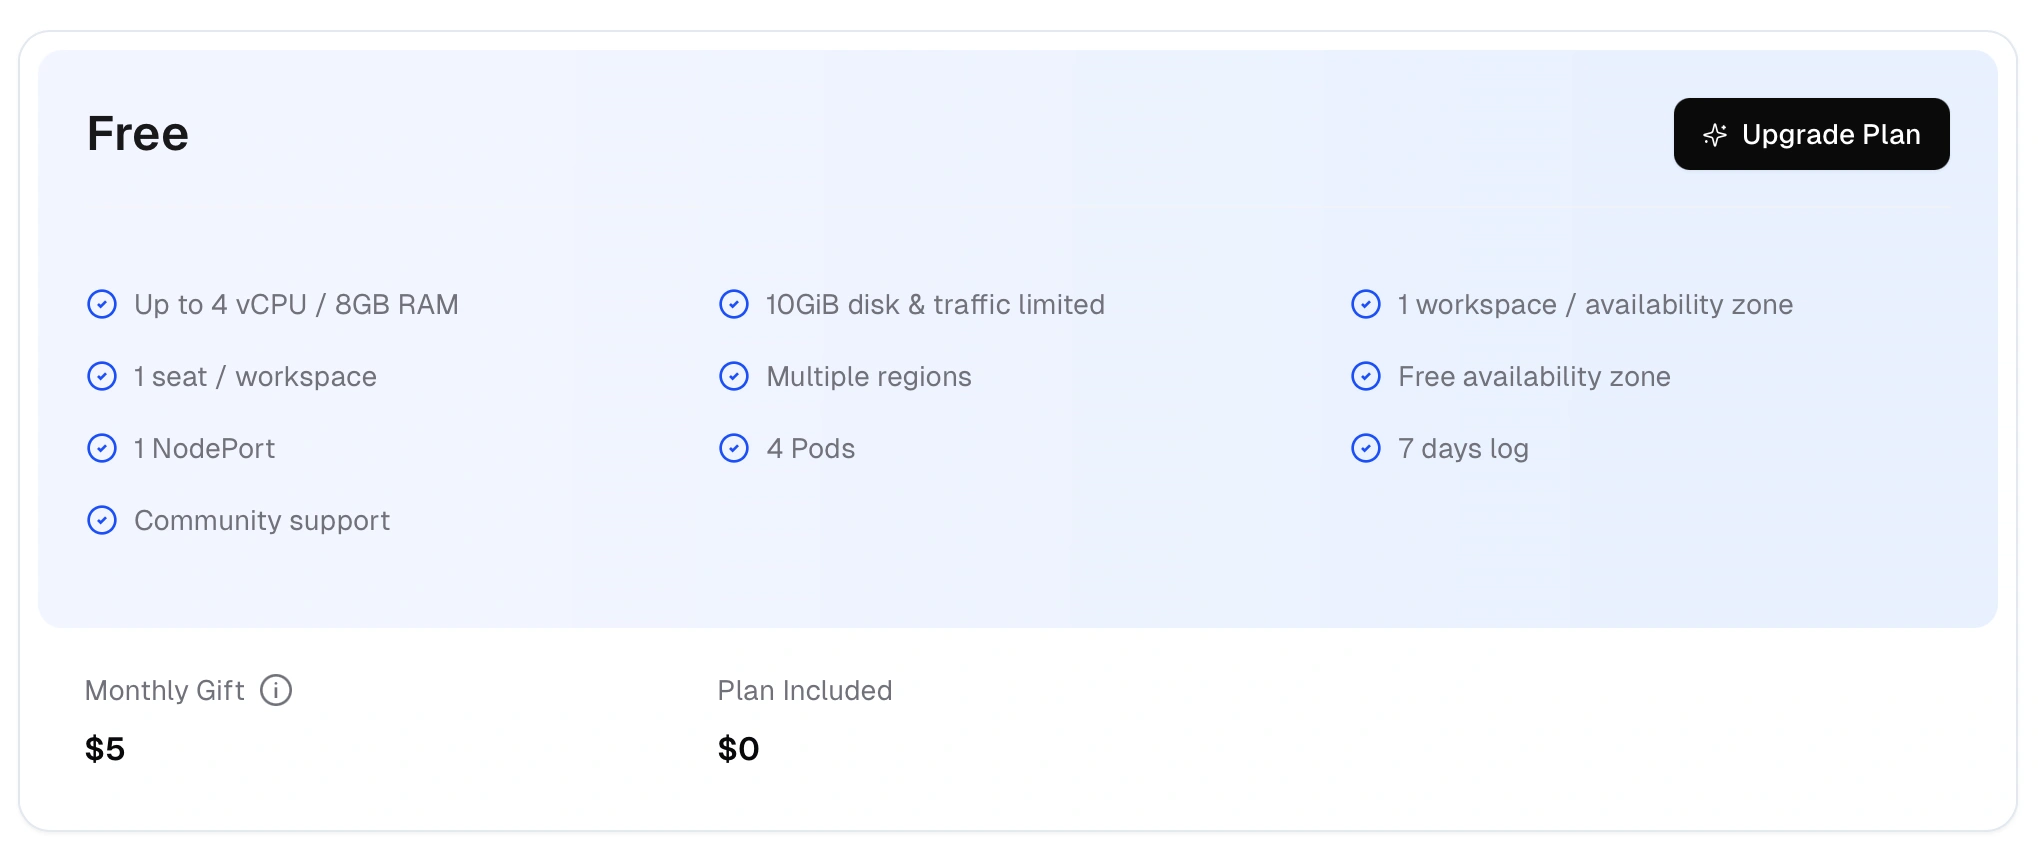
# Step 1: Login Console and Check Free Tier
Login to Claw Cloud console, select Github login, click Plan in the upper right corner to see the monthly $5 free tier.
# Step 2: Create Application Instance
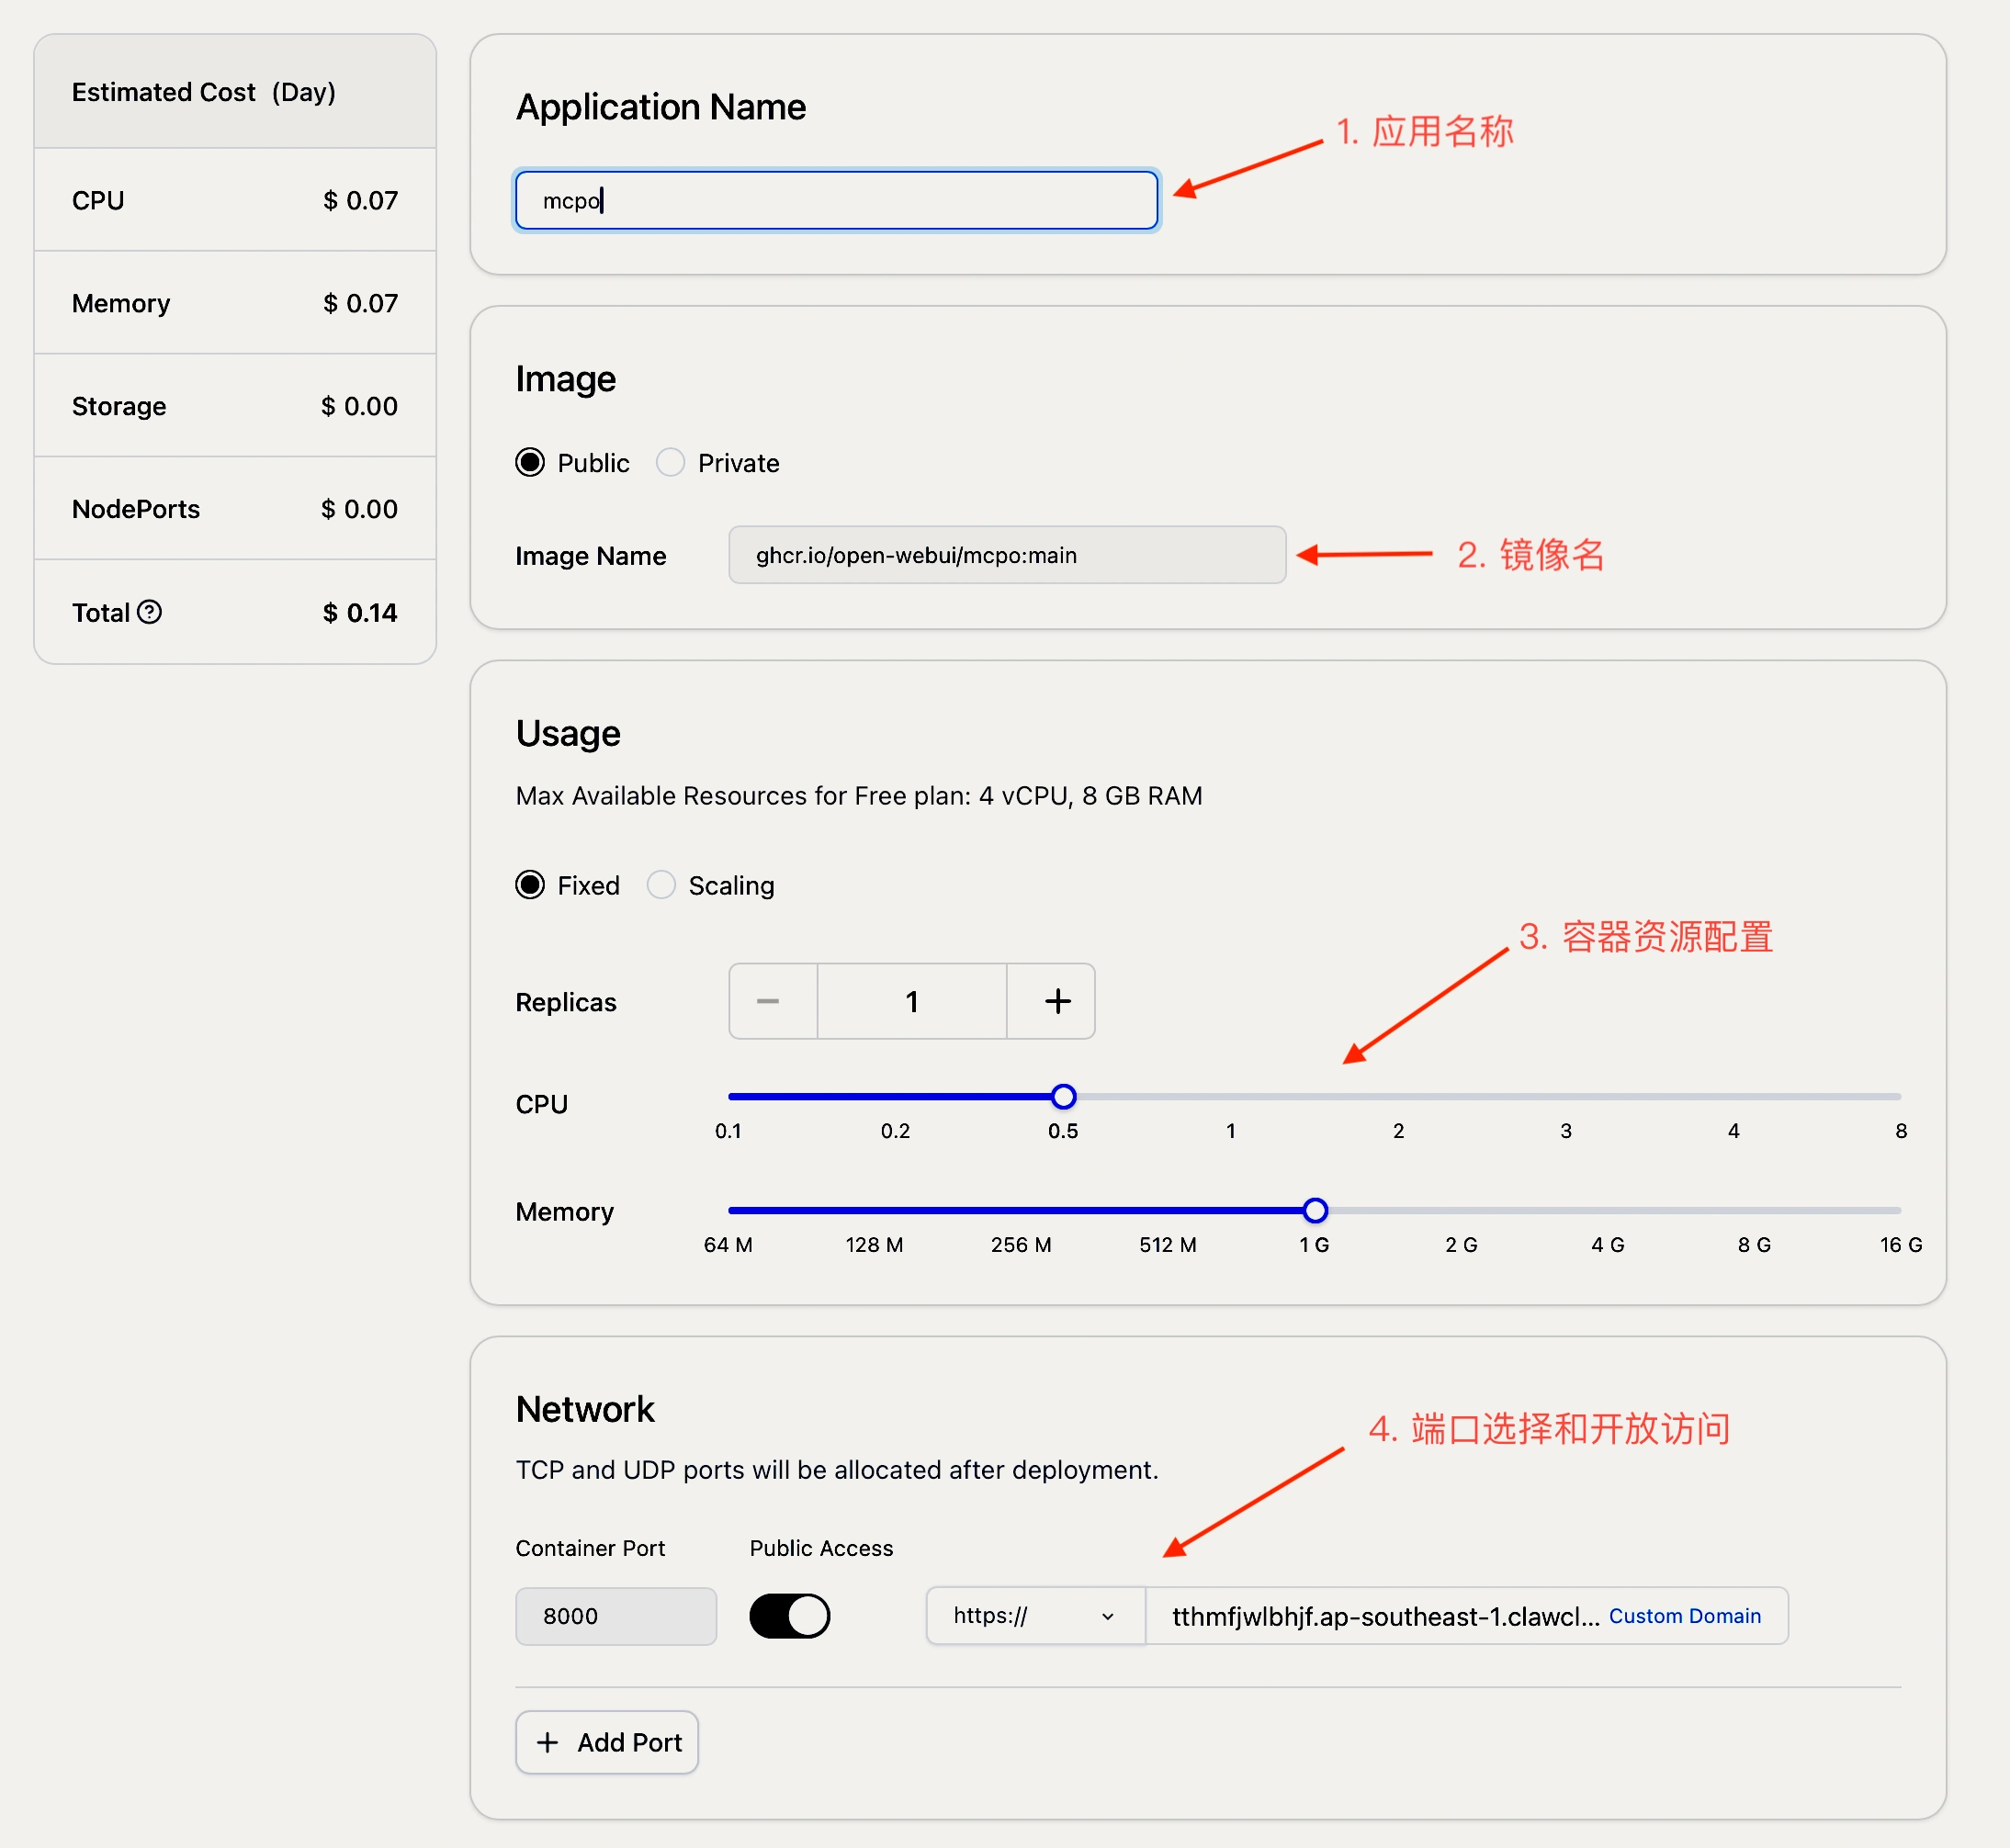
Return to homepage, enter App Launchpad, click Create App, fill in application name (such as mcpo), and complete the following settings:
- Application Name: mcpo
- Image Name: ghcr.io/open-webui/mcpo:main
- Resource Size: 0.5vCPU, 1GB Memory
- Port: 8000
- Enable Public Access: Yes
- Custom Domain: Optional, requires CNAME resolution configuration to Claw Cloud domain
# 2.4 Configure Application Parameters
# Step 3: Set Startup Command
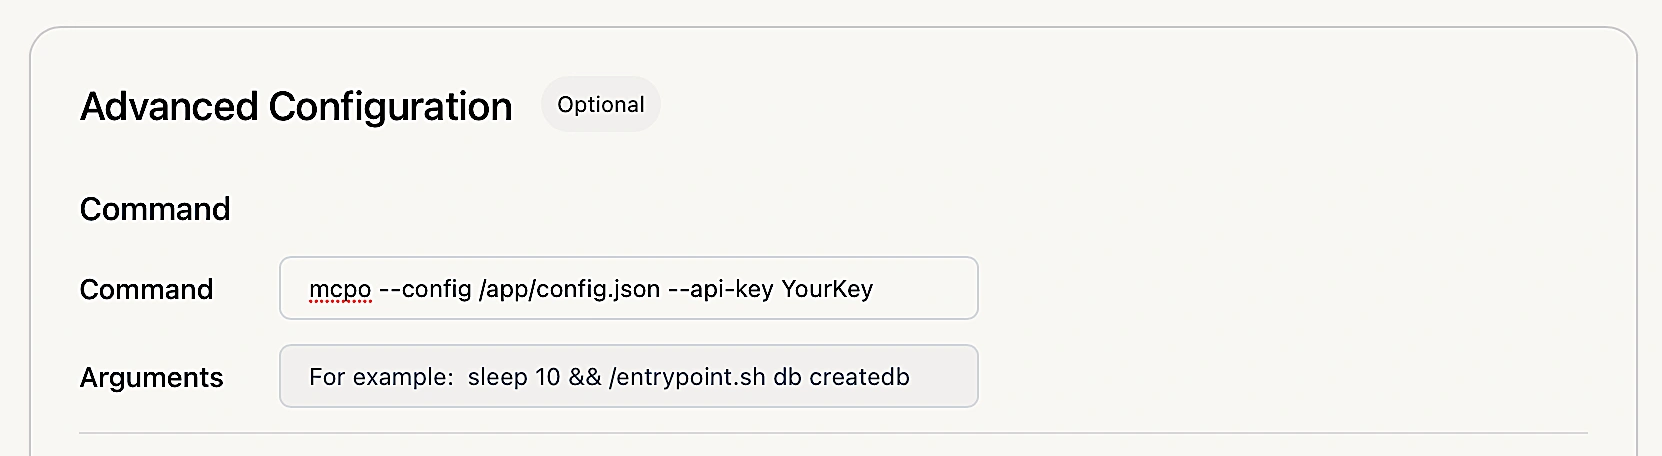
Set startup command to mcpo --config config.json, set API Key for access control:
Important
For security, please use strong passwords as API Keys and rotate them regularly. Do not expose actual API Keys in public code.
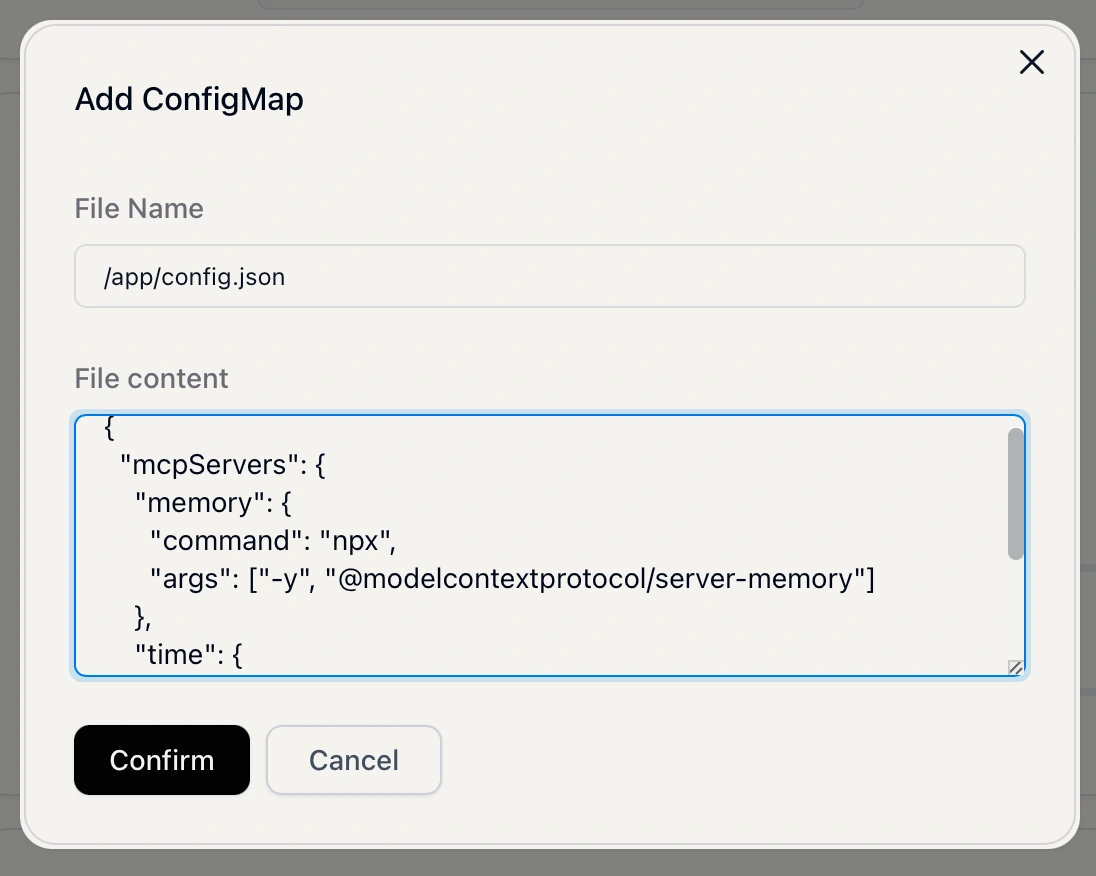
# Step 4: Configure MCP Servers
Configure config.json file, add /app/config.json file in Configmaps with the same content as the local testing config.json:
Warning
When configuring remote SSE or Streamable HTTP type MCP Servers, ensure to only add trusted servers. Malicious MCP Servers may perform unsafe operations.
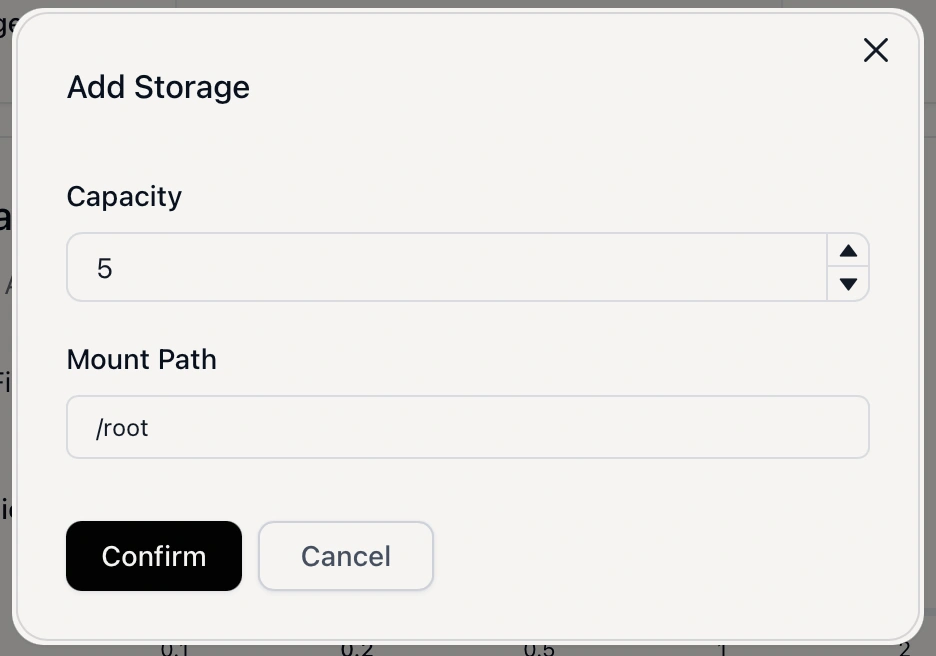
# Step 5: Configure Persistent Storage
Add local storage, mount /root directory, generally 5GB storage space is sufficient:
# 2.5 Deploy Application
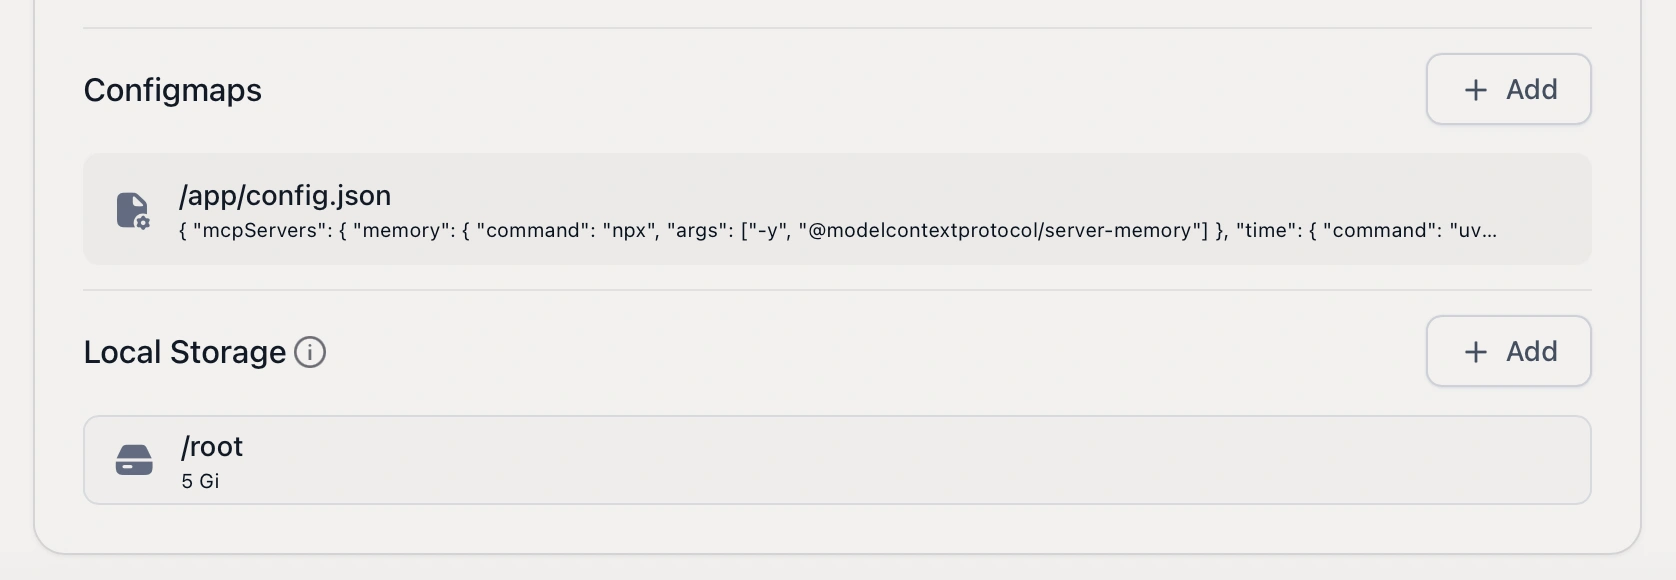
# Step 6: Complete Configuration and Deploy
After completing the above configuration, it looks like this:
# Step 7: Deploy and Verify
Click the Deploy Application button in the upper right corner to deploy MCPO service. When it shows running status and accessing /openapi.json through the domain has normal response, deployment is successful:

# Part Three: Connecting Tool Servers in Open WebUI
# 3.1 Connect MCPO Server
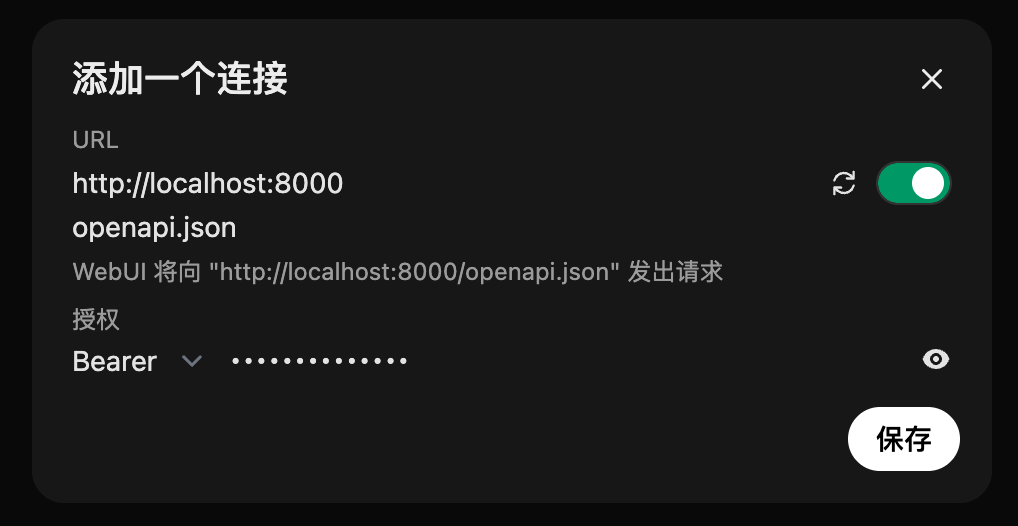
# Step 1: Add Tool Server
Connect the running MCPO server to Open WebUI:
- Open Open WebUI in browser
- Open ⚙️ Settings
- Click ➕ Tools, add new tool server
- Enter the running OpenAPI tool server URL (such as Claw Cloud Run default domain:
https://xxx.ap-southeast-1.clawcloudrun.com) - Click “Save”
Warning
When adding tool servers, ensure:
- Use HTTPS protocol to ensure data transmission security
- Verify server URL validity to avoid incorrect addresses
- Only connect to trusted MCPO servers
- If server requires API Key authentication, enter it in the appropriate field
# 3.2 User Tool Servers vs Global Tool Servers
If you are an administrator, you can configure global tool servers in Admin Settings → Tools → Manage Tool Servers. The difference between these two methods can be referenced from the official explanation:
The main difference between user tool servers and global tool servers is where API connections and requests actually occur:
User tool servers make requests directly from the browser (client) to the tool server. This means you can safely connect to localhost URLs, even expose private endpoints or development-only endpoints, and the connection is private.
Global tool servers connect through the Open WebUI backend (server). The backend must be able to access the specified tool server URL. This method allows sharing tools with other users in the deployment scope. Requests are made by the backend, cannot access personal local resources through this method, and security needs careful consideration.
| Tool Server Type | Request Origin | Use Localhost? | Use Case Examples |
|---|---|---|---|
| User Tool Server | Browser Client | Yes | Personal tools, local development/testing |
| Global Tool Server | Open WebUI Backend | No | Team/shared tools, enterprise integration |
Tip
User tool servers are suitable for personal use and local development testing, can directly connect to localhost URLs. Global tool servers are suitable for production or shared environments where everyone needs access to the same tools.
# 3.3 Using Tool Servers
# Step 2: Use Tools in Chat Interface
After completing the above steps, you can find the tool server in the chat interface (below the input box):
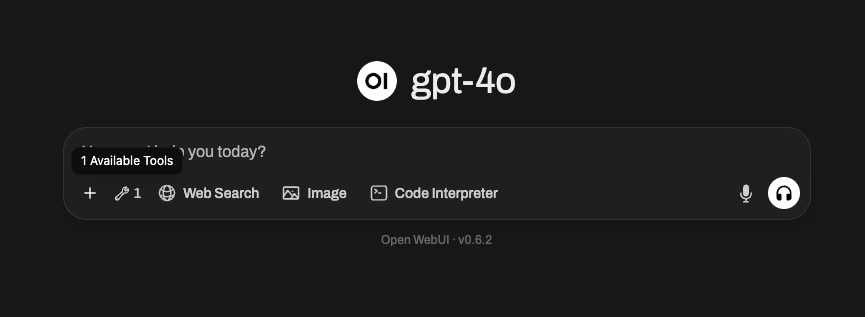
Clicking this icon opens a popup window where you can:
- View connected tool server information
- See which tools are available and which server provides them
- Debug or disconnect any tools when necessary
Tip
Global tool servers have different appearance and require clicking the ➕ button in the message input area to display tool information.
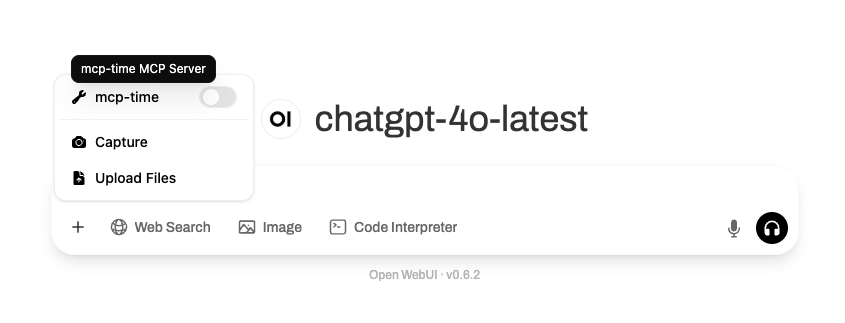
Important
They won’t appear in the tool indicator popup until enabled through the ➕ menu.
Each global tool must be individually enabled to activate in the current chat.
Once enabled, their functionality is the same as user tools.
Administrators can control access to global tools through role-based permissions.
This is ideal for team settings or shared environments where common tools (such as document search, web queries) provide centralized access to multiple users.
# 3.4 Enable Native Tool Mode
# Step 3: Configure ReACT Style Function Calling
To directly enable ReACT style (reasoning + execution) local function calling in conversations, you need to enable native tool mode in model settings:
- Go to ⚙️ Chat Controls → Advanced Params
- Change function calling parameter from
DefaulttoNative
# Part Four: Common Issues and Troubleshooting
Here are some common issues and solutions:
# 4.1 Cannot Connect to MCPO Server
- Ensure MCPO service is running and port configuration is correct
- Check firewall settings to ensure access to specified ports is allowed
- If using Claw Cloud Run, ensure domain and port are correctly configured
- Check MCPO service logs for more error information
# 4.2 Tools Not Working Properly
- Ensure MCP Server is correctly configured and tool configuration in
config.jsonfile is correct - Check MCPO’s OpenAPI documentation to ensure tool API paths and parameters are correct
- If tools require specific permissions or API Keys, ensure they are correctly set
# 4.3 Tool Server Response Slow
- Check MCPO service resource configuration to ensure sufficient CPU and memory allocation
- If using Claw Cloud Run, check if current free tier is exhausted
- Ensure MCP Server performance is good, optimize tool implementation if necessary
# 4.4 Tools Not Displaying in Open WebUI
- Ensure tool server is correctly connected and tool server URL is correct
- Check Open WebUI settings to ensure tool server is enabled
- If using global tool server, ensure it’s correctly configured in admin settings
# Summary
Integrating MCP capabilities into Open WebUI through MCPO not only extends AI assistant functionality but also simplifies tool management processes through standardized interfaces. Leveraging Claw Cloud Run’s free tier, developers can deploy MCPO services at zero cost, achieving cloud-based access to MCP tools.
The advantages of this solution include:
- Flexibility: Supports any MCP-compatible tools, easily extensible by modifying config.json
- Cost-effectiveness: Utilizes free container resources without additional server costs
- Security: Isolates local services from web interfaces through proxy layer
- Scalability: Smoothly upgrades resource configuration as business needs grow
Important
Regularly monitor Claw Cloud Run’s free tier policies and MCPO project updates to get the latest features and best practices. For production environments, consider configuring monitoring alerts and regular backups to ensure stable service operation.